
When it comes to home siding, Hardie siding installation stands out as a superior choice. Hardie siding, also known as fiber cement siding, is renowned for its durability, aesthetic appeal, and low maintenance requirements. Made from a blend of cement, sand, and cellulose fibers, it is designed to withstand harsh weather conditions, resist pests and fire, and provide long-lasting beauty to your home.
Why Choose Hardie Siding for Your Home
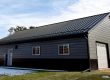
Choosing Hardie siding for your home is not just about its durability; it’s also about the value it adds. It enhances curb appeal and increases your home’s resale value. Its versatility in design and color options makes it a popular choice for various architectural styles, from traditional to contemporary.
Overview of Installation Process
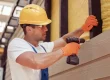
Hardie siding installation is a process that demands precision and expertise. From preparing your home’s exterior to the final touches, each step plays a crucial role in ensuring the siding’s longevity and effectiveness. In this guide, we will walk you through these steps, ensuring you’re well-informed whether you’re planning a DIY project or hiring professionals.
Preparation for Hardie Siding Installation
Tools and Materials Needed
Before starting your Hardie siding installation, gather all the necessary tools and materials. This includes safety gear, saws for cutting the siding, levels, tape measures, nail guns, and caulking guns. Additionally, ensure you have the Hardie siding, trim boards, and fasteners ready.
Measuring and Ordering the Right Amount
Accurate measurement is crucial for a successful Hardie siding installation. Measure the walls of your home to calculate the total square footage. It’s advisable to order a bit extra to account for cuts and waste. This ensures you won’t run short during the installation.
Preparing the Worksite
Clear the area around your home, removing obstacles that might hinder the installation process. Ensure the walls are clean, dry, and flat. Any damage to the existing siding or structure should be repaired beforehand to provide a solid base for the Hardie siding.
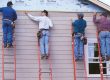
Step-by-Step Guide to Installing Hardie Siding
Starting with the First Row
Begin the Hardie siding installation from the bottom of your walls. Use a starter strip to ensure the first row is level and straight. This foundational row is critical as it sets the tone for the rest of the installation.
Techniques for Cutting and Fitting
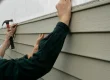
Cutting Hardie siding requires specific tools like a circular saw with a diamond blade. Always cut the siding outdoors and use proper safety gear to avoid inhaling dust. Measure and mark the siding accurately before cutting, ensuring a snug fit around corners and edges.
Ensuring Proper Alignment and Spacing
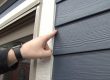
Alignment and spacing are key in Hardie siding installation. Ensure each plank is level, and maintain uniform gaps between planks as recommended by the manufacturer. This not only ensures a visually pleasing finish but also allows for natural expansion and contraction.
Addressing Windows and Doors
Cutting and Fitting Around Windows
When installing Hardie siding around windows and doors, precision is key. Cut the siding to fit snugly around these openings, leaving appropriate gaps for caulking. This not only enhances the appearance but also prevents water infiltration.
Sealing and Waterproofing Techniques
Sealing gaps around windows and doors is crucial in Hardie siding installation. Use high-quality, exterior-grade caulk to seal these gaps, ensuring your home is protected from moisture and drafts.
Aesthetic Considerations for Door and Window Trims
Choose trims that complement both your Hardie siding and the architectural style of your home. Properly installed trims not only add to the aesthetic appeal but also play a role in the structural integrity of the siding.
Corner Trim and Finishings
Installing Corner Trims for a Seamless Look
Corner trims play a crucial role in the overall look of your Hardie siding installation. They should be installed before the siding, ensuring a clean, seamless appearance. Choose trims that match or complement your siding for a cohesive look.
Selecting the Right Trim Style
The style of trim you select can significantly impact the aesthetic of your home. Whether you prefer a bold, contrasting look or a more subtle, blended appearance, ensure the trim aligns with the overall design theme of your house.
Finishing Touches for a Professional Look
The final touches in Hardie siding installation involve checking for any gaps or misalignments and addressing them promptly. Apply paint if necessary, following the manufacturer’s guidelines to maintain the warranty.
Weather Considerations and Hardie Siding
Importance of Weather Barriers
In Hardie siding installation, a weather-resistant barrier is essential. This barrier protects your home from moisture and helps in maintaining energy efficiency. Ensure it’s properly installed and intact before applying the siding.
Handling Moisture and Insulation
Proper moisture management is critical in Hardie siding installation. Ensure there is adequate ventilation and that the siding is installed with a slight gap from the surface to allow for drainage and drying.
Best Practices for Weather-Proof Installation
To maximize the weather-resistant qualities of Hardie siding, follow best installation practices. This includes correct nailing techniques, maintaining appropriate clearances from the ground and rooflines, and using flashing where necessary.
Maintenance Tips for Hardie Siding
Routine Cleaning and Upkeep
One of the advantages of Hardie siding is its low maintenance. Regular cleaning with a garden hose and soft brush can keep it looking new. Avoid using high-pressure washers which can damage the siding.
Identifying and Addressing Common Issues
Be vigilant for signs of wear like chipping paint or caulking failure. Address these issues promptly to maintain the integrity of your Hardie siding installation.
Long-Term Maintenance Strategies
Plan periodic inspections of your Hardie siding to identify and rectify any potential issues. This proactive approach will extend the life and appearance of your siding.
Cost Analysis of Hardie Siding Installation
Estimating Material Costs
The cost of Hardie siding materials varies based on the style and finish you choose. Generally, it’s more expensive than vinyl but less than brick or stone, offering a good balance of cost and durability.
Labor Costs and DIY Considerations
Professional Hardie siding installation can be costly, but it ensures correct installation and adherence to warranty requirements. If you’re considering DIY, factor in the cost of tools and additional materials.
Long-Term Cost Benefits
The long-term cost benefits of Hardie siding include increased home value, reduced maintenance costs, and longevity. It’s an investment that pays off over time.
Comparing Hardie Siding to Other Siding Materials
Durability and Lifespan Compared to Other Materials
Hardie siding is known for its exceptional durability and long lifespan, outperforming materials like wood and vinyl in harsh weather conditions.
Aesthetic and Design Flexibility
Hardie siding offers superior aesthetic and design flexibility, with a range of textures and colors that mimic natural wood or stucco, fitting various architectural styles.
Environmental Impact and Sustainability
Hardie siding is an environmentally responsible choice. Its long lifespan reduces the need for frequent replacements, and its composition includes sustainable materials.
Frequently Asked Questions (FAQs)
What is Hardie siding made of?
Hardie siding, also known as HardiePlank, is made of fiber cement, a composite material made of cement, sand, and cellulose fibers.
How long does Hardie’s siding last?
Hardie siding is known for its durability and can last up to 50 years or more with proper maintenance.
Is Hardie siding weather-resistant?
Yes, Hardie siding is highly resistant to various weather conditions, including rain, wind, hail, and temperature extremes.
Can Hardie’s siding be painted?
Yes, Hardie’s siding can be painted. It holds paint very well compared to wood and other siding materials.
Is Hardie siding fire-resistant?
Yes, Hardie siding is non-combustible and fire-resistant, making it a safe option for residential homes.
How much does Hardie’s siding installation cost?
The cost varies depending on factors like the size of your home, the style of siding, and labor costs. It is generally more expensive than vinyl siding but less than brick.
Can I install Hardie siding myself?
While experienced DIYers can install Hardie siding, professional installation is recommended to ensure proper technique, and adherence to building codes, and to maintain the product warranty.
Does Hardie siding require a lot of maintenance?
Hardie siding is low maintenance. It typically requires just cleaning with a hose and soft brush to keep it looking new.
How does Hardie siding impact the resale value of a home?
Hardie siding can increase a home’s resale value due to its durability, aesthetic appeal, and longevity.
Is Hardie siding environmentally friendly?
Yes, Hardie siding is considered environmentally friendly due to its long lifespan, reducing the need for frequent replacements, and its sustainable material composition.
Conclusion
To maximize the benefits of Hardie siding, ensure a quality installation. Whether you hire professionals or opt for DIY, following the manufacturer’s guidelines is crucial for performance and warranty.
Take advantage of the warranties and guarantees offered by Hardie Siding. These provide peace of mind and protect your investment in the long run.
In conclusion, Hardie siding installation is a wise choice for homeowners seeking durability, aesthetic appeal, and value. By following proper installation and maintenance practices, you can enjoy the benefits of Hardie siding for years to come.