
House siding installation is a crucial aspect of home improvement that significantly enhances the exterior appearance, insulation, and overall value of your home. Whether you’re updating old siding or installing new siding for the first time, understanding the process and options available is essential. In this comprehensive guide, we’ll walk you through everything you need to know about house siding installation, from preparation to maintenance.
House Siding Installation
Importance of House Siding
House siding serves as the first line of defense against the elements, protecting your home from rain, wind, snow, and extreme temperatures. It also plays a vital role in insulating your home, reducing energy costs, and enhancing curb appeal. Properly installed siding can prevent water damage, mold growth, and structural issues.
Overview of the Installation Process
The house siding installation process involves several steps, including preparation, removing old siding, installing new siding panels, and finishing touches. Each step requires attention to detail and adherence to best practices to ensure a durable and aesthetically pleasing result.
Benefits of Proper Siding Installation
Proper siding installation offers numerous benefits, including improved energy efficiency, enhanced home value, and long-term durability. High-quality siding materials, when installed correctly, can last for decades, providing a low-maintenance solution that enhances your home’s overall appearance.
Types of House Siding Materials
Vinyl Siding
Vinyl siding is one of the most popular choices due to its affordability, durability, and low maintenance requirements. It comes in a variety of colors and styles, making it easy to match any architectural design. Vinyl siding is resistant to moisture and pests, making it a practical option for many homeowners.
Wood Siding
Wood siding offers a timeless, natural look that can significantly enhance a home’s aesthetic appeal. Common types of wood siding include cedar, redwood, and pine. While wood siding requires more maintenance, such as painting or staining, its unique beauty, and charm are unmatched.
Fiber Cement Siding
Fiber cement siding is a durable and versatile option that mimics the appearance of wood, stucco, or masonry. It is highly resistant to fire, termites, and rot, making it a long-lasting and low-maintenance choice. Fiber cement siding is available in various textures and colors, providing great design flexibility.
Preparing for House Siding Installation
Assessing Your Home’s Current Siding
Before starting the house siding installation, assess your home’s current siding condition. Look for signs of damage, such as cracks, warping, or rot, and determine whether any underlying structural issues need to be addressed. This assessment will help you plan the installation process effectively.
Gathering Necessary Tools and Materials
Gather all the necessary tools and materials for the installation. Essential tools include a tape measure, level, utility knife, hammer, circular saw, and safety equipment like gloves and goggles. Additionally, ensure you have enough siding panels, nails, screws, and other materials to complete the project.
Safety Precautions and Measures
Safety should be a top priority during house siding installation. Wear appropriate safety gear, including gloves, safety glasses, and a hard hat. Use ladders and scaffolding properly, and follow all manufacturer guidelines for the tools and materials you are using. Working safely helps prevent accidents and ensures a successful installation.
Choosing the Right Siding for Your Home
Factors to Consider
When choosing siding for your home, consider factors such as climate, budget, and maintenance requirements. For example, vinyl siding is ideal for humid climates due to its moisture resistance, while wood siding may require more upkeep in wet areas. Your choice should balance aesthetics, durability, and cost.
Comparing Costs and Durability
Different siding materials come with varying costs and durability levels. Vinyl siding is typically the most affordable, while wood and fiber cement siding are more expensive but offer superior durability and aesthetics. Consider the long-term costs, including maintenance and potential replacements, when comparing options.
Aesthetic Considerations
Aesthetic considerations are crucial when selecting siding. The color, texture, and style of the siding should complement your home’s architecture and personal preferences. Take the time to explore different designs and consult with a professional if needed to ensure the chosen siding enhances your home’s curb appeal.
Measuring and Calculating Siding Needs
Measuring Your Home’s Exterior
Accurate measurements are essential for determining the amount of siding needed. Measure the height and width of each wall, including windows and doors. Multiply the height by the width to get the square footage of each wall, then add up the total square footage to calculate the siding requirements.
Calculating Material Requirements
Once you have the total square footage, add a 10% buffer to account for waste and cutting errors. This buffer ensures you have enough siding to complete the project without running out of materials. Order the siding based on these calculations to avoid delays and additional costs.
Ordering the Correct Amount of Siding
Order the correct amount of siding from a reputable supplier. Provide them with your measurements and specifications, and confirm the delivery date. Having all materials on-site before starting the installation helps streamline the process and prevents interruptions.
Removing Old Siding
Tools Needed for Removal
Removing old siding requires specific tools, such as a pry bar, hammer, and utility knife. You may also need a reciprocating saw to cut through nails and screws. Ensure you have all the necessary tools before beginning the removal process.
Steps to Safely Remove Old Siding
Start by removing any trim or accessories attached to the old siding. Use a pry bar to gently lift and remove the siding panels, working from the bottom up. Be cautious to avoid damaging the underlying structure or insulation. Dispose of old siding materials responsibly.
Disposing of Old Siding Materials
Properly dispose of old siding materials by taking them to a recycling center or landfill. Some materials, such as wood and metal, may be recyclable. Check with local waste management authorities for guidelines on disposing of construction debris.
Installing the Starter Strip and Trim
Importance of the Starter Strip
The starter strip is a crucial component of the house siding installation process. It provides a level base for the first row of siding panels, ensuring they are aligned correctly. Installing the starter strip accurately is essential for the overall appearance and function of the siding.
How to Install the Starter Strip
To install the starter strip, measure and mark a level line along the bottom of the wall. Attach the starter strip along this line using nails or screws, ensuring it is straight and secure. The starter strip should overlap the foundation slightly to direct water away from the wall.
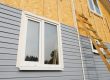
Installing Trim Around Windows and Doors
Installing trim around windows and doors adds a finished look to your siding installation. Measure and cut the trim pieces to fit around the openings, then attach them using nails or screws. Ensure the trim is level and properly sealed to prevent water infiltration.
Attaching House Wrap and Flashing
Purpose of House Wrap
House wrap acts as a moisture barrier, protecting the underlying structure from water damage. It also helps improve energy efficiency by reducing air leaks. Applying house wrap before installing siding is a critical step in the installation process.
Installing House Wrap Correctly
To install house wrap, start at the bottom of the wall and work your way up. Overlap the seams by at least 6 inches and secure the wrap with staples or nails. Ensure the wrap is smooth and free of wrinkles, as gaps or folds can compromise its effectiveness.
Adding Flashing to Vulnerable Areas
Flashing is essential for protecting vulnerable areas, such as roof edges, windows, and doors, from water infiltration. Install flashing along these areas before applying siding. Use metal or vinyl flashing and ensure it is properly sealed and integrated with the house wrap.
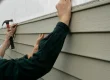
Installing New Siding Panels
Aligning the First Panel
Aligning the first panel is critical for a successful house siding installation. Start at the bottom corner of the wall and ensure the panel is level. Secure the panel with nails or screws, placing fasteners in the designated slots to allow for expansion and contraction.
Securing Panels Properly
Secure siding panels properly by following the manufacturer’s instructions. Use corrosion-resistant nails or screws, and avoid driving fasteners too tightly, as this can cause warping. Leave a small gap between panels to allow for thermal movement.
Overlapping and Staggering Panels
Overlap and stagger siding panels to create a seamless appearance and improve water resistance. Each row should overlap the one below it by at least an inch. Stagger the joints in adjacent rows to prevent weak points and enhance the overall strength of the siding.
Cutting Siding Panels to Fit
Tools for Cutting Siding
Cutting siding panels requires specific tools, such as a circular saw with a fine-tooth blade, tin snips, or a utility knife. Ensure your tools are sharp and in good condition to make clean, accurate cuts.
Techniques for Accurate Cuts
Measure and mark the panels before cutting to ensure accuracy. Use a straightedge or square to guide your cuts, and make sure the panel is securely supported to prevent movement. For curved or irregular cuts, use tin snips or a utility knife.
Dealing with Irregular Spaces and Shapes
Irregular spaces and shapes, such as corners and window openings, require careful measurement and cutting. Create templates from cardboard or paper to help you cut panels accurately. Take your time to ensure a precise fit and a professional finish.
Finishing Touches and Details
Installing Corner Caps
Corner caps provide a finished look and protect the corners of your siding. Measure and cut the caps to fit, then secure them with nails or screws. Ensure the caps are aligned properly and sealed to prevent water infiltration.
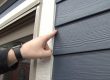
Sealing Joints and Edges
Sealing joints and edges is essential for preventing water infiltration and ensuring a weather-tight installation. Use a high-quality exterior caulk to seal gaps between siding panels, around windows and doors, and at the corners. Apply the caulk evenly and smooth it with a caulk tool or your finger.
Painting or Staining Siding (if necessary)
If your siding requires painting or staining, choose a high-quality exterior paint or stain designed for the material. Follow the manufacturer’s instructions for application, and ensure the surface is clean and dry before starting. Properly applied paint or stain enhances the siding’s appearance and durability.
Maintenance Tips for House Siding
Regular Cleaning and Inspection
Regular cleaning and inspection are essential for maintaining your siding’s appearance and performance. Clean the siding annually with a mild detergent and water, using a soft brush or cloth. Inspect for signs of damage, such as cracks, warping, or loose panels, and address any issues promptly.
Addressing Damage and Repairs
Address damage and repairs promptly to prevent further issues. Replace damaged panels, re-seal joints and edges, and fix any loose or missing fasteners. Regular maintenance ensures your siding remains in good condition and extends its lifespan.
Long-term Maintenance Strategies
Long-term maintenance strategies include periodic inspections, cleaning, and timely repairs. Keep vegetation and debris away from the siding, and ensure proper drainage around your home’s foundation. These practices help prevent moisture buildup and other issues that can damage your siding.
Frequently Asked Questions (FAQs)
1. How Long Does Siding Installation Take?
The time required for siding installation depends on the size of your home and the type of siding. On average, it can take a few days to a couple of weeks. Larger homes and more complex installations may take longer.
2. Can I Install Siding Myself?
Yes, you can install siding yourself if you have the necessary tools, materials, and skills. However, siding installation requires precision and attention to detail. For best results and to avoid costly mistakes, consider hiring a professional if you’re not confident in your abilities.
3. What Are the Common Mistakes to Avoid?
Common mistakes in siding installation include not allowing for expansion and contraction, driving fasteners too tightly, not using house wrap, and improperly sealing joints and edges. Avoid these mistakes to ensure a durable and professional-looking installation.
4. How Often Should I Replace My Siding?
The lifespan of siding depends on the material. Vinyl siding typically lasts 20-40 years, wood siding can last 20-30 years with proper maintenance, and fiber cement siding can last up to 50 years. Regular maintenance can extend the life of your siding.
5. What is the Best Time of Year for Siding Installation?
Spring and fall are the best times for siding installation, as the moderate temperatures and lower humidity levels make the installation process easier and more efficient. However, siding can be installed year-round with the right precautions.
6. How Much Does Siding Installation Cost?
The cost of siding installation varies based on the material, the size of your home, and labor costs in your area. On average, expect to pay between $5,000 and $15,000. Get multiple quotes from reputable contractors to find the best price for your project.
7. Can Siding Be Installed Over Existing Siding?
In some cases, new siding can be installed over existing siding, but it depends on the condition of the old siding and local building codes. If the existing siding is damaged or not properly attached, it’s best to remove it before installing new siding.
8. How Do I Choose the Right Siding Contractor?
Choose a siding contractor with a good reputation, proper licensing, and insurance. Ask for references, check online reviews, and get multiple quotes. A reliable contractor will provide a detailed estimate and answer any questions you have about the installation process.
9. What Are the Benefits of Insulated Siding?
Insulated siding improves energy efficiency by reducing heat loss and gain. It can help lower energy bills, increase indoor comfort, and add an extra layer of protection against the elements. Insulated siding also enhances the durability and appearance of your home.
10. How Do I Maintain the Color of My Siding?
To maintain the color of your siding, clean it regularly with a mild detergent and water. Avoid using harsh chemicals or pressure washers, as they can damage the surface. If your siding is painted, repaint it every 5-10 years to keep it looking fresh and vibrant.
Conclusion
House siding installation is a crucial investment that enhances the aesthetic appeal, energy efficiency, and overall value of your home. By understanding the various types of siding materials, the preparation process, and the detailed steps involved in the installation, you can ensure a successful project. Whether you decide to take on the task yourself or hire a professional, having a comprehensive understanding of the process will help you make informed decisions and achieve the best possible results.
Proper preparation, accurate measurements, and attention to detail are essential for a durable and visually appealing siding installation. Regular maintenance, such as cleaning, inspecting for damage, and addressing repairs promptly, will extend the lifespan of your siding and keep your home looking its best.
Remember to choose siding materials that suit your climate, budget, and aesthetic preferences. Consider the long-term benefits and costs associated with each material to make a decision that meets your needs. Hiring a reputable contractor can ensure that the installation is done correctly and efficiently, providing you with peace of mind and a beautifully finished home exterior.