
Hardie board siding installation is an essential project for homeowners looking to enhance the durability and appearance of their homes. Hardie board, known for its longevity and low maintenance, is a popular choice due to its resistance to weather and pests. This guide will walk you through the entire process of Hardie board siding installation, from preparation to maintenance, ensuring you achieve professional results.
What is Hardie Board Siding?
Composition and Materials
Hardie board siding, also known as fiber cement siding, is made from a blend of cement, sand, and cellulose fibers. This combination creates a highly durable and resilient material that can withstand extreme weather conditions. The inclusion of cellulose fibers enhances its flexibility and strength, making it less prone to cracking.
Varieties and Styles
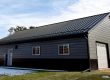
Hardie board siding comes in a variety of textures and finishes to suit different architectural styles. You can choose from smooth finishes for a sleek, modern look or wood-grain textures that mimic traditional wood siding. Popular color options include earth tones and vibrant shades, allowing homeowners to customize their exterior to match their aesthetic preferences.
Benefits of Hardie Board
One of the primary benefits of Hardie board siding is its resistance to weather and pests. Unlike wood siding, Hardie board does not rot or attract termites. It also withstands harsh weather conditions, including heavy rain, strong winds, and hail. Additionally, it requires minimal maintenance, offering a long-lasting solution for homeowners seeking durability and peace of mind.
Preparing for Installation
Assessing Your Home’s Exterior
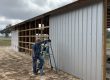
Before starting the Hardie board siding installation, assess your home’s exterior for any damage or repairs needed. Check for rotting wood, loose siding, or structural issues that may need to be addressed before installation. Accurate measurement of the surface area is crucial to determine the amount of siding required.
Gathering Necessary Tools and Materials
To ensure a smooth installation process, gather all necessary tools and materials beforehand. Essential tools include a tape measure, circular saw, level, hammer, and nails. Safety equipment, such as gloves, safety glasses, and a dust mask, is also vital to protect yourself during the installation.
Planning the Layout
Planning the layout of your Hardie board siding is a critical step. Create a detailed siding layout plan that includes measurements, the positioning of boards, and any special considerations for windows, doors, and other obstructions. Proper ventilation and insulation should also be factored into your plan to ensure the siding performs optimally.
Removing Old Siding
Safety Precautions
When removing old siding, safety should be your top priority. Wear protective gear, including gloves, safety glasses, and a dust mask, to protect yourself from debris and potential hazards. Be cautious when handling materials that may contain hazardous substances, such as asbestos.
Step-by-Step Removal Process
Begin the removal process by detaching the old siding using a pry bar or similar tool. Work carefully to avoid damaging the underlying structure. Once the siding is removed, dispose of the debris responsibly, following local regulations for waste disposal.
Inspecting the Underlying Structure
After removing the old siding, inspect the underlying structure for any damage or rot. Check the sheathing and framing for signs of wear and make necessary repairs. Addressing these issues before proceeding with the Hardie board siding installation will ensure a solid foundation for your new siding.
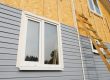
Installing the Weather Barrier
Importance of a Weather Barrier
A weather barrier is crucial in protecting your home from moisture and drafts. It acts as a secondary line of defense against water infiltration, preventing potential damage to the structure. Common types of weather barriers include house wrap and felt paper.
Installation Steps
To install the weather barrier, measure and cut the material to fit the walls of your home. Secure the barrier to the house using staples or nails, ensuring it is tightly attached with no gaps. Pay special attention to corners and edges to ensure complete coverage.
Ensuring Proper Sealing
Proper sealing around windows, doors, and other openings is essential to prevent water infiltration. Use flashing tape or caulking to seal these areas, and overlap seams of the weather barrier to create a continuous protective layer.
Measuring and Cutting Hardie Board
Accurate Measurements
Accurate measurements are crucial for a successful Hardie board siding installation. Measure the walls carefully, noting the dimensions and marking guidelines for cutting. Accurate cuts ensure a professional finish and reduce material wastage.
Cutting Techniques
Cutting Hardie board siding requires specific tools and techniques. Use a circular saw equipped with a diamond-tipped blade for precise cuts. Always wear safety gear, including a dust mask, as cutting fiber cement produces fine dust. Make straight cuts for long edges and use a jigsaw for more intricate shapes.
Creating Custom Shapes
When dealing with windows, doors, and other obstructions, custom shapes may be necessary. Measure and mark the areas carefully before cutting. Handle corners and edges with care to ensure they fit snugly and seamlessly into the overall layout.
Installing Starter Strips
Purpose of Starter Strips
Starter strips are essential for ensuring the first row of Hardie board siding is level and securely attached. They provide a stable base for the siding and support the bottom edge, preventing it from warping or shifting.
Installing the First Strip
Position the first starter strip along the bottom of the wall, ensuring it is level. Secure it with nails or screws, checking for alignment. A correctly installed starter strip sets the foundation for the rest of the siding, ensuring a uniform and professional appearance.
Common Mistakes to Avoid
Avoid common mistakes such as misalignment and inadequate support when installing starter strips. Ensure the strip is level and securely attached to prevent future issues. Double-check measurements and positioning before proceeding to the next step.
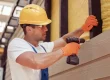
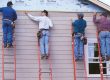
Attaching Hardie Board Siding
Starting at the Bottom
Begin attaching the Hardie board siding at the bottom of the wall. Align the first board with the starter strip and secure it with nails or screws. Check for level alignment and ensure the board is flush with the wall.
Working Upwards
Continue working upwards, overlapping each board correctly to create a watertight seal. Maintain consistent spacing between the boards to ensure a uniform appearance. Use a level to check alignment periodically and make adjustments as needed.
Dealing with Obstructions
When encountering windows, doors, and other obstructions, measure and cut the boards to fit snugly around these areas. Use flashing and caulking to seal the gaps and prevent water infiltration. Handle vents and fixtures carefully to ensure they are properly integrated into the siding.
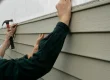
Nailing and Fastening Techniques
Choosing the Right Fasteners
Selecting the right fasteners is crucial for the longevity and stability of your Hardie board siding installation. Use corrosion-resistant nails or screws designed for fiber cement siding. Stainless steel or hot-dipped galvanized fasteners are recommended for their durability.
Proper Nailing Techniques
Avoid overdriving nails, as this can damage the siding and compromise its integrity. Drive nails flush with the surface of the board without penetrating too deeply. Ensure each board is securely attached, but allow for slight movement to accommodate expansion and contraction.
Spacing and Pattern
Follow the recommended nailing patterns for Hardie board siding to ensure optimal performance. Maintain proper spacing between fasteners, typically 16 inches on center. This spacing ensures the siding is securely attached without excessive fastener use.
Installing Trim and Flashing
Purpose of Trim
Trim enhances the aesthetics of your Hardie board siding installation by providing clean, finished edges around windows, doors, and corners. It also protects these areas from moisture and helps prevent water infiltration.
Cutting and Installing Trim
Measure and cut trim pieces to fit around windows, doors, and corners. Secure the trim using nails or screws, ensuring it is flush with the siding. Double-check measurements and alignment to ensure a professional finish.
Flashing Techniques
Flashing is essential for directing water away from vulnerable areas. Install flashing around windows, doors, and other openings, ensuring it overlaps the siding and trim. Properly installed flashing prevents water infiltration and protects the underlying structure from damage.
Caulking and Sealing
Importance of Caulking
Caulking is crucial for preventing moisture intrusion and enhancing insulation. It seals gaps and joints, ensuring a watertight barrier. Proper caulking also improves the overall appearance of the siding by creating smooth, finished edges.
Choosing the Right Caulk
Select a high-quality, paintable caulk designed for exterior use. Color-matching options are available to blend seamlessly with your siding. Ensure the caulk is compatible with fiber cement to achieve optimal results.
Application Techniques
Apply caulk to seams and joints using a caulking gun. Smooth the caulk with a caulking tool or your finger to create a neat finish. Pay special attention to areas around windows, doors, and trim to ensure a complete seal.
Painting and Finishing Touches
Priming the Siding
Priming is essential for ensuring the paint adheres properly to the Hardie board siding. Apply a coat of primer evenly across the surface, allowing it to dry thoroughly before painting. Priming also enhances the durability of the paint and protects the siding.
Choosing Exterior Paint
Select a high-quality exterior paint specifically designed for fiber cement siding. Consider color options that complement your home’s architecture and surroundings. Ensure the paint provides adequate protection against UV rays and weather elements.
Painting Techniques
Use brushes or rollers to apply the paint evenly. Multiple coats may be necessary to achieve the desired coverage and finish. Allow each coat to dry thoroughly before applying the next. Proper painting techniques enhance the longevity and appearance of your Hardie board siding.
Maintenance Tips for Hardie Board Siding
Regular Cleaning
Regular cleaning is essential for maintaining the appearance and integrity of your Hardie board siding. Remove dirt, mildew, and other debris using a soft brush and mild detergent. Avoid using high-pressure washers, as they can damage the siding.
Inspecting for Damage
Periodically inspect your siding for cracks, chips, or other damage. Address any issues promptly to prevent further deterioration. Check for signs of moisture infiltration, such as discoloration or swelling, and take necessary steps to rectify the problem.
Long-Term Care
To ensure the longevity of your Hardie board siding, consider repainting and resealing it every 10-15 years. Regular maintenance and prompt repairs will keep your siding looking new and performing optimally for many years.
Frequently Asked Questions (FAQs)
1. How long does Hardie board siding last?
Hardie board siding can last up to 50 years or more with proper maintenance. Its durability and resistance to weather and pests make it a long-lasting choice for homeowners.
2. Is Hardie board siding worth the investment?
Yes, Hardie board siding is worth the investment due to its durability, low maintenance, and resistance to weather and pests. It enhances the value and appearance of your home.
3. Can I install Hardie board siding myself?
While it is possible to install Hardie board siding yourself, it is recommended to hire a professional for optimal results. Proper installation requires specific tools and techniques to ensure longevity and performance.
4. How do I clean Hardie board siding?
Clean Hardie board siding using a soft brush and mild detergent. Avoid high-pressure washers, as they can damage the siding. Regular cleaning helps maintain its appearance and integrity.
5. Can Hardie board siding be painted?
Yes, Hardie board siding can be painted. Use a high-quality exterior paint specifically designed for fiber cement siding. Proper painting techniques enhance its longevity and appearance.
6. What is the cost of Hardie board siding installation?
The cost of Hardie board siding installation varies depending on the size of your home and the complexity of the project. On average, it ranges from $10 to $14 per square foot, including materials and labor.
7. Does Hardie board siding require maintenance?
Hardie board siding requires minimal maintenance. Regular cleaning, periodic inspections, and repainting every 10-15 years are recommended to ensure its longevity and performance.
8. How does Hardie board compare to vinyl siding?
Hardie board siding is more durable and resistant to weather and pests compared to vinyl siding. It offers a more realistic wood-like appearance and requires less maintenance. However, it is more expensive than vinyl siding.
9. Can Hardie board siding withstand extreme weather?
Yes, Hardie board siding is designed to withstand extreme weather conditions, including heavy rain, strong winds, and hail. Its composition makes it highly durable and resilient.
10. Is Hardie board siding environmentally friendly?
Hardie board siding is considered environmentally friendly due to its long lifespan and low maintenance requirements. Its composition includes sustainable materials, making it a more eco-friendly choice compared to other siding options.
Conclusion
Hardie board siding installation is a valuable investment for homeowners seeking durability, low maintenance, and aesthetic appeal. By following this comprehensive guide, you can achieve professional results and enjoy the benefits of Hardie board siding for many years. Regular maintenance and prompt repairs will ensure your siding remains in excellent condition, protecting your home and enhancing its value.